Monday, October 27, 2008

MSDN Question on WPF: How to decrease font-size automatically so that it fits completely inside a label?

Problem
I came across an interesting question on WPF forums. A user has a fixed size label which text can be very large. But since the size of the label is fixed, the text gets truncated which he does not want. The user wanted to automatically decrease the font-size such that it fits into the label completely.
Solution
One solution is to write some code to determine the available space and based on the space available use FormattedText and set the text dynamically. But I devised an easier solution.
There is a container in WPF called ViewBox which automatically scales the content inside such that it fits into the space completely. The idea is to use this ViewBox inside the template of the Label. The XAML code that does this is shown.

<Label Width="200" Height="300" Content="This is a very long text that you would be using to set the control text">
<
Label.Template>
<
ControlTemplate>
<
Viewbox>
<
ContentPresenter
Content="{TemplateBinding Property=ContentControl.Content}" />
</
Viewbox>
</
ControlTemplate>
</
Label.Template>
</
Label>

Now, when you run an application hosting such a label, the screenshots are shown.


image


The same application with much longer text is shown below.


image 
Hope this would be helpful to many!

Friday, October 24, 2008

Visual Tree Helper Methods

Shown below are two useful methods that works on a VisualTreeHelper class and makes it easy to access elements that are otherwise not easy to access. I would show you concrete examples to use it later, but for now here is the code for the two methods.

   1: public List<T> GetChildrenOfType<T>(DependencyObject parent) where T : DependencyObject


   2: {


   3:    List<T> list = new List<T>();


   4:    int childCount = VisualTreeHelper.GetChildrenCount(parent);


   5:    for (int i = 0; i < childCount; i++)


   6:    {


   7:        DependencyObject child = VisualTreeHelper.GetChild(parent, i);


   8:        //get the current child                 


   9:        if (child is T) list.Add((T)child);


  10:        //if it is of type that you are looking for, then add it to the list        


  11:        list.AddRange(GetChildrenOfType<T>(child)); // on that get a list of children that it has.            


  12:    } 


  13:    return list;


The above method can be used to search for any UIElement given its parent as a parameter. For example, GetChildrenOfType<Button>(StackPanel1) returns a list of all buttons hosted inside the StackPanel. A cut down version of this method is where it just returns the first item.


   1: public T GetChild<T>(DependencyObject parent) where T : DependencyObject


   2: {


   3:     //if(parent is Label) return parent;             


   4:     int childCount = VisualTreeHelper.GetChildrenCount(parent);


   5:     for (int i = 0; i < childCount; i++)


   6:     {


   7:         DependencyObject child = VisualTreeHelper.GetChild(parent, i);


   8:         if (child is T) return (T)child;


   9:         T childLabel = GetChild<T>(child);


  10:         if (childLabel != null) return childLabel;


  11:     } return default(T);


  12: }


The method is again easy to use.


So where did I use these methods? Working with TreeView?


How do I expand a TreeView completely?

This not a straight-forward issue since we know that most of the UI in WPF is virtualized unless otherwise specified. So I have a tree view and I would to completely expand the list. So how do I do it? What are the issues? If you set the TreeView IsExpanded property to true, it only expands the first level of children. So we need to repeat the process again on the children of the just appeared children. But they are not in the Visual Tree unless the lay out is updated. The method shown below works great to toggle expand/collapse of a tree view.


   1: private void ToggleButton_Click(object sender, RoutedEventArgs e)        


   2: {            


   3:          ToggleExpandCollapse(tvQueries); //start toggling with the parent.        


   4: }        


   5:  


   6: private void ToggleExpandCollapse(DependencyObject dO)        


   7: {           


   8:            foreach (TreeViewItem ti in GetChildrenOfType<TreeViewItem>(dO))            


   9:            {             


  10:                ti.IsExpanded = !ti.IsExpanded; //toggle expanded property.            


  11:                // update the layout such that Visual Tree gets updated       


  12:                tvQueries.UpdateLayout(); 


  13:                //now repeat the toggling on the current TreeViewItem            


  14:                ToggleExpandCollapse(ti);               


  15:            }       


  16: } 


Update


Bea just posted a simpler way to do this.


   1: <Style TargetType="TreeViewItem"> 


   2:           <Setter Property="IsExpanded" Value="True" /> 


   3: </Style>


Friday, October 17, 2008

C# Code to check if the machine is 64-bit

I once had a requirement for the same problem. I figured out the solution but never made a point to blog it. But recently few others had the same issue and I had to think again how I did it. Anyway here is the simple method which tells you if you are running a 64-bit OS.

public bool Is64BitMachine()
{
return IntPtr.Size == 8;
}

The idea is to use size of the IntPtr to determine if it is 64-bit or 32-bit. In case of 32-bit machines, IntPtr size is 4 bytes.

Thursday, October 16, 2008

WPF Performance : UI Virtualization


UI Virtualization is a technique adopted by WPF where the framework creates only those UI elements that are visible to the user. For example, if you have 1000 textblock controls inside a ListView and you can only view 10 of them, then only 10 textblocks would be present inside the VisualTree. As you scroll down, those elements which are no more visible would be disposed and the next set of visible items would be created. This type of virtualization gives great UI performance benefits in both speed and memory.

UI virtualization in WPF is provided by means of VirtualizingStackPanel and is enabled by default. You could explicitly specify UI virtualization on/off on a StackPanel as shown.


<StackPanel VirtualizingStackPanel.IsVirtualizing="True"></StackPanel>


Note that UI Virtualization works only as long as the ItemsControl generates its own template. If a template is generated and then added virtualization would be disabled. So, the catch with UI Virtualization is that it is disabled in certain cases. One such case is where you override ItemsPanelTemplate or Template of an ItemsControl. In such cases where ItemsPanelTemplate is customized by the developer, UI Virtualization would be disabled. So, if your ItemsControl would show loaded data, then you are in trouble. To avoid this and to enable UI Virtualization inspite of overriding ItemsPanelTemplate, we need to use a VirtualizingStackPanel.

In order to test out the effect of having virtualization and not having it, I wrote a simple application. It has a listview whose itemspanel template has been customized - first with normal StackPanel and then VirtualizingStackPanel. It loads textblocks from a list of names.
When I ran a test with 1000000 items in the list and in case of no-virtualization, the program never started. It took almost 2 GB of memory and never saw the light. So I had to kill it. Then with virtualization, the program started in no time and only had 200MB memory usage. Before that let us look at the XAML and code behind I used. It also shows you how to customize ItemsPanelTemplate and use VirtualizingStackPanel.


<Windowx:Class="NiceControlsTest.Window2"
xmlns="http://schemas.microsoft.com/winfx/2006/xaml/presentation"
xmlns:x="http://schemas.microsoft.com/winfx/2006/xaml"
Title="Window2"Height="300"Width="300"Loaded="Window_Loaded">
<Grid>
<ListView ItemsSource="{BindingNames}"Name="lv">
<ListView.ItemsPanel>
<ItemsPanelTemplate>
<!--<StackPanel/>
If StackPanel was used, the memory consumed was over 2GB and dead slow.
-->
<VirtualizingStackPanel>
<!--Memory footprint is only 200 mb-->
</VirtualizingStackPanel>
</ItemsPanelTemplate>
</ListView.ItemsPanel>
<ListView.ItemTemplate>
<DataTemplate>
<TextBlock Text="{Binding}"/>
</DataTemplate>
</ListView.ItemTemplate>
</ListView>

</Grid>
</Window>


The Code behind is very simple.


public partial class Window2 : Window
{
public List<string> Names { get; set; }
private DateTime start;
public Window2()
{
start = DateTime.Now;
InitializeComponent();
Names = new List<string>();
for (int i = 0; i < 10000; i++)
Names.Add("Name : " + i);
lv.DataContext = this;
}

private void Window_Loaded(object sender, RoutedEventArgs e)
{
MessageBox.Show((DateTime.Now - start).TotalSeconds.ToString());
}
}


I did a precise measurement on time taken from construction of window to loading the window. It was noticed that using just the StackPanel, for the 10000 items used ( I reduced the number for faster measurements ), the memory used was around 176 MB and start up time was between 7 to 10 seconds. While with VirtualizingStackPanel, the memory footprint was just over 16 MB and the start up time was between 0.3 to 0.8 seconds.

Personally, I feel its a great benefit to us developers. We can design and develop large scale heavy duty graphical applications and yet need not worry about optimization to certain level.

Wednesday, October 15, 2008

Building desktop executable from XBAP project

I just ran across this question on MSDN forums where a member wanted to build .exe from the same XBAP project which he wishes to use locally and XBAP for the Internet. So is it possible? Well, it is possible. There is nothing magic that happens in XBAP build procedure. Both XBAP and windows executables have OutputType set to WinExe in the csproj definition. Anyway, if you look at the XBAP project bin files after a build, you notice a .exe is also generated. And we know XBAP are accessed from browser with .xbap extension. So what is this executable doing there?

If you open the executable inside reflector and navigate to main() method in the App class, you notice that the App is created and InitializeComponent() is called. But you do not find Run() be invoked on that App. Where as in a normal executable, you can see something like:

	App app = newApp(); 
app.InitializeComponent();
app.Run(); //missing in XBAP exe


For this reason, the exe generated in a XBAP build does not run in spite of you clicking it. So this must give an idea that if we can make the build process to add app.Run() to the XBAP executable, we could generate a windows executable out of the same XBAP set of files. So how do we do this?


If you open the XBAP project file(.csproj), you can see the following additional statements inside the project group.


<EnableSecurityDebugging>true</EnableSecurityDebugging>
<Install>False</Install>
<StartAction>URL</StartAction>
<HostInBrowser>true</HostInBrowser>
<BootstrapperEnabled>false</BootstrapperEnabled>
<TargetZone>Internet</TargetZone>
<GenerateManifests>true</GenerateManifests>
<SignManifests>True</SignManifests>
<ManifestKeyFile>NiceXBAP_TemporaryKey.pfx</ManifestKeyFile><ManifestCertificateThumbprint>E84CB4F96A15C0B07DDD12A6A731ECC918298250</ManifestCertificateThumbprint>


If you comment these lines from the Project/PropertyGroup node and rebuild the project, you end up getting actual executable that runs and shows WPF application, just like normal windows application. This has been an interesting find for me and I hope those of you who wants to generate two sets of builds using the same set of files. Note that XBAP assemblies have certain security limitations. So you cannot use a fully trusted WPF application's project, make changes and generate a XBAP. It might not work as you expect.

As of deployment of XBAPs, refer to this post which explains what mime-types should be enabled on the IIS. It is a pretty long post, so you might want to scroll down until you see "WPF application types and wpf-ish applications" section.


Update: Tool to generate WPF application for desktop from XBAP project.

Use the following code to generate a .csproj which when used in msbuild or Visual Studio generates a desktop WPF executable. For beginners, if you like to use msbuild to run a build process then, the command is


msbuild /t:build /p:configuration=debug projectFile.csproj


Anyway, the code I wrote is shown below.


class Program 
{
static void Main(string[] args)
{
if(args.Length==0)
{
Console.WriteLine("Usage: Pass path to the folder that has the CSPROJ file.");
return;
}
String path = args[0];
String projFile = GetCSProjFile(path);
Console.WriteLine("Project File Loaded : " + projFile);
XDocument xdoc = XDocument.Load(projFile);
xdoc.Descendants().Where(it => ShouldRemove(it.Name)).Remove();
Console.WriteLine("Saving project file");
xdoc.Save(path + "\\desktopProjectFile.csproj");
}

private static string GetCSProjFile(string path)
{
string projFile = Directory.GetFiles(path).FirstOrDefault(it => it.EndsWith("csproj"));
if (projFile == null)
throw new ApplicationException("No CSProj file found in the directory");
else
{
return projFile;
}
}

private static bool ShouldRemove(XName xName)
{
List removalList = new List()
{
"HostInBrowser",
// "BootstrapperEnabled",
// "TargetZone",
// "GenerateManifests",
// "SignManifests",
// "ManifestKeyFile",
// "ManifestCertificateThumbprint",
// "StartAction"
};
//Only HostInBrowser option is good enough to generate Windows Executable that runs on desktop.
//The other options when removed does not generate unwanted stuff like .application files etc.

if (removalList.FirstOrDefault(it => xName.LocalName.EndsWith(it)) == null)
return false;
else
{
return true;
}
}
}


The code is not tested and is just a proof-of-concept. There would be a bug or two, but it does generate a valid CSProj file that builds successfully.


Tuesday, October 14, 2008

MSDN Question on WPF: How do I set Window.Icon Property?

Today, I came across a post on MSDN forums where one of the members was not able to set Icon property from C#. Turns out Window.Icon is a dependency property and is of type "ImageSource".

Anyway, given a System.Drawing.Image, you could use the following method to obtain the ImageSource.
public static ImageSource FromImage(System.Drawing.Image image)
{
            MemoryStream ms = new MemoryStream();
            image.Save(ms, System.Drawing.Imaging.ImageFormat.Gif);
            return BitmapFrame.Create(ms);
}

You could set the icon using the method, as shown below.
this.Icon = FromImage(System.Drawing.Image.FromFile("Creek.jpg"));

There might definitely be a better way to do that, but it works (might not be faster).

So, if you directly want to set Creek.jpg as Window icon(from code), you could do this.
Uri iconUri = new Uri("Creek.JPG", UriKind.RelativeOrAbsolute);
.Icon = BitmapFrame.Create(iconUri);
 

Monday, October 13, 2008

Deleting duplicate rows with unique key from MySQL

A requirement just popped up for me, where I have to delete rows with duplicate "MainUrl" but these rows have unique ID, generated as an auto-increment column. Thought, it would be a straight-forward thing, but not until I actually sat down writing the query. Finally, after some lookup and some meditation, I ended up with the following query.
DELETE FROM    CrawledUrl
WHERE ID NOT IN
(
SELECT    MIN(ID)
 
FROM  CrawledUrl
  GROUP BY   MainUrl)
  AND
IsProcessed <> 'True'

Well, now that I have tested it in SQL Server, it worked and I was happy. So I decided to try it out on my production database (I now call my thesis database as production database, sounds professional). So, I ran the query  and I ended up with this error:
ERROR 1093 (HY000): You can't specify target table 'CrawledUrl' for update in FROM clause
So after doing a little more meditation, I came to know that MySQL right now does not support both updates and select on the same table.
So, the fix? The problem, like I mentioned is to work on the same table which MySQL does not allow. So we need a temporary table - create one or let MySQL create one.

So when does MySQL create a temporary database? It does when you create an alias in the query saying (select * from myTable) as mT. Now mT is a temporary table and no longer the same myTable. So pretty neat huh!

Finally, the changed query was:
   1: delete FROM thesis.CrawledUrl


   2:     WHERE  ID NOT IN


   3:     (


   4:     SELECT MIN(ID)


   5:         FROM  (select Id,MainUrl from thesis.CrawledUrl) as x


   6:         GROUP BY  MainUrl)


   7:     and IsProcessed = 'False'


Friday, October 10, 2008

Problem Binding ListBoxItems from one Listbox to another

The following XAML was posted online at MSDN.
<StackPanel Orientation="Vertical" Name="sp">
            <
ListBox Name="lb1" Width="200" Height="200" SelectionMode="Multiple">
                <
ListBoxItem>Item1</ListBoxItem>
                <
ListBoxItem>Item5</ListBoxItem>
                <
ListBoxItem>Item3</ListBoxItem>
                <
ListBoxItem>Item2</ListBoxItem>
            </
ListBox>
            <
ListBox Name="lb2" Width="200" Height="200"
                
ItemsSource="{Binding Path=SelectedItems, ElementName=lb1}">
            </
ListBox>
</
StackPanel>

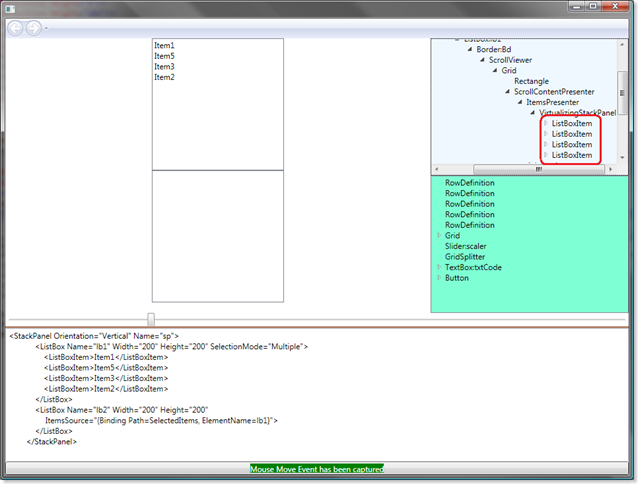
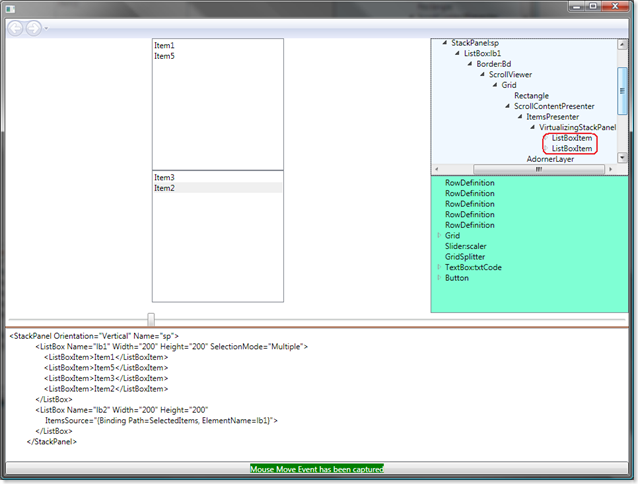
This means that when user selects an item from Listbox1, they should appear in listbox 2. But what happens you select Listbox1 is that the items disappear from Listbox1 and appear in Listbox2. The items go missing altogether! The screenshots of the behavior as well as the visual tree dumps to prove this is shown below.
Initially after the XAML load
image
After selecting two items
image  
In case you are wondering about the tool I am using to run the XAML, it is called BuddiPad, my custom XAML tool which has small features like XAML error parsing, go-to-error line, loads Visual Tree, Loads Logical Trees, etc. The listbox on the top right with a whitish background is the Visual tree while the one below with a Teal like background is the Logical Tree.

If you notice, selected items appear in lb2 (in image 2) disappear from the Visual Tree for the lb1 altogether. This happens only with the ListBoxItems as ItemsSource. But if the ItemsSource was bound to some other dependency property like "Roles" or "Users" or any other user defined props in the class, it does not break.

The workaround is to  create new ListBoxItem and copy content property. Create a Selected property which is a Dependency Property as shown.

public
IList Selected
        {
            get { return (IList)GetValue(SelectedProperty); }
            set { SetValue(SelectedProperty, value); }
        }

      
// Using a DependencyProperty as the backing store for MyProperty.  This enables animation, styling, binding, etc...
       
public static readonly DependencyProperty SelectedProperty =
            DependencyProperty.Register("Selected", typeof(IList), typeof(Window1), new UIPropertyMetadata(null));

The XAML is shown  for reference.

<
StackPanel Orientation="Vertical" Name
="sp">
            <
ListBox x:Name="lb1" Width="200" Height="200" SelectionMode="Multiple" SelectionChanged
="lb1_SelectionChanged">
                <
ListBoxItem
>
                    <
Button>Item1</Button
>
                </
ListBoxItem
>
                <
ListBoxItem>Item5</ListBoxItem
>
                <
ListBoxItem>Item3</ListBoxItem
>
                <
ListBoxItem>Item2</ListBoxItem
>
            </
ListBox
>
            <
ListBox x:Name="lb2" Width="200" Height
="200"
                
ItemsSource="{Binding Selected
}">
            </
ListBox
>
</
StackPanel>

Now inside the constructor of the Window which has the listboxes, set the DataContext for sp so that it knows where to look for Selected.

public
Window1()
        {
            InitializeComponent();
            sp.DataContext = this;
            Selected = new List<object>();
        }

Now in the SelectionChanged event of Lb1, you update the Selected property collection accordingly. The code which does just that is shown.

private void
lb1_SelectionChanged(object sender, SelectionChangedEventArgs e)
       {
           IList l = new List<Object>();
          
           foreach (var x in lb1.SelectedItems)
           {
               l.Add(Clone(x));
           }
           Selected = l;
         
//BindingOperations.GetBindingExpressionBase(lb2, ListBox.ItemsSourceProperty).UpdateTarget();
      
}

Again, another problem arises here. How do we clone WPF elements? The idea is to get XAML for the given WPF element, convert it back to object. Simply way to clone. The code for the function Clone() is shown.

public
Object Clone(Object o)
{
       string xamlCode = XamlWriter.Save(o);
       return XamlReader.Load(new XmlTextReader(new StringReader(xamlCode)));
}

I posted solution for this problem at : http://social.msdn.microsoft.com/Forums/en-US/wpf/thread/3da8c3b9-0a91-49c6-a460-f9215a294f29

Just in case, here is the draft.

MSDN Question on WPF: Keeping ComboBox selection unchanged

I came across this interesting question on MSDN WPF forums where a user had a combo box whose XAML can be like shown.


<ComboBox SelectionChanged="ComboBox_SelectionChanged" Name="myFoo" Width="100" Height="20" >
<ComboBoxItem>Item1</ComboBoxItem>
<ComboBoxItem>Item2</ComboBoxItem>
<ComboBoxItem>Browse</ComboBoxItem>
</ComboBox>

The requirement is that when the user selects "Browse", a dialog should pop up and based on the answer from the user (Yes/No) you should either show browser in combo box as selected or just keep the previously selected item in the selection. That is, if Item1 is selected and then Browse is selected, and the user clicks No, then Item1 should still remain selected. So, how do we suppress the selection for such cases?

The idea is to keep track of previously selected item. If current selection is "Browse" then we ask for user input for yes or no using a message box(or any dialog for that matter). If the answer is no, then we should not show Browse => we set back the SelectedValue property back to the "previous". If current selection is not Browse, then it becomes the "previous". The code that does this is shown below.


/// &lt;summary&gt;
/// Keeps track of the last selected combobox item by the user.
/// &lt;/summary&gt;
private ComboBoxItem prev;
/// &lt;summary&gt;
/// fromEventHandler if set to true indicates that the event handler has been fired because of a change made to the selected item
/// of the combobox from a event handler and not from code.
/// You set this to true if the selection is browse. And then set it back to false later.
/// &lt;/summary&gt;
private bool fromEventHandler = false;
private void ComboBox_SelectionChanged(object sender, SelectionChangedEventArgs e)
{
if (fromEventHandler) return;

//If browse is selected from the combobox
if ((myFoo.SelectedValue as ComboBoxItem).Content.ToString() == "Browse")
{
//An example of a dialog. If dialog result is No, then you do not show Browse in the item and instead show the previously selected option
if (MessageBox.Show("Set or No Set", "Yes to see Browse, No to revert to previous item", MessageBoxButton.YesNo) == MessageBoxResult.No)
{
fromEventHandler = true;
myFoo.SelectedValue = prev;
fromEventHandler = false;
//e.Handled = true; //not required, still works without this.
}
}
else //if any other item is selected, we store it as previously selected item
{
prev = myFoo.SelectedValue as ComboBoxItem;
}
}


So why do we need "fromEventHandler" variable? The reason is that if when you "SelectedValue" to "prev", then the SelectionChanged Event would fire again and the dialog box would be shown once more. So, to suppress this, we need a way to keep track of selection changes made from the event handler.

I hope this was little helpful.

Thursday, October 09, 2008

Realizing my mistakes : Phone Interview Question and Comments

Today as I managed my blog settings, I realized two mistakes.

So let me first fix these two mistakes before you guys point out more.

1. Monitoring comments on my blog.

The comments are now monitored and I have set up email notifications for any comments posted. I apologize for not doing this earlier and I intend to reply to any comment posted. Your email address on the comment would be appreciated.

2. Lame code

Let me not repeat what I said in the post. Basically, you take source code with function calls as input and properly format it. For example,

foo (bar ( new Point(x, graph.getY()) )); should be formatted as

foo ( bar ( new Point ( x, graph.getY ( ) ) ) ) ;

Look at my earlier lame solution. Thanks to someone's comment, I realized the code I mentioned there works but is not readable and forget about maintainability. But at that time, I took the statement "i dont  care how you write the code" in the problem description too seriously. This time, again I write the same code but its better. And yet I am not using Regular Expressions. Someday I would be a great Reg Ex guy! The new code is

public static void RunSnippet()
{
string code = "foo (bar ( new Point(x, graph.getY()) ));"
;
code = Replace(code,
'('
);
code = Replace(code,
')'
);
Console.WriteLine(code);
}
public static string Replace(string code,char
ch)
{
string
[] splits = code.Split(ch);
string fCode=string
.Empty;
foreach(string split in
splits)
fCode+=
string.Format("{0} {1} "
,split,ch);
fCode = fCode.Substring(
0,fCode.Length-3
);
return
fCode.Trim();
}

Wednesday, October 08, 2008

MSDN Question: How do I access Assembly Information values set from Project Properties dialog?

I just came across this interesting question in WPF forum where a developer wanted to know if there is a straight-forward way to access the assembly information such as Title, Description, Version, etc. Note that when you set these values from Project Properties->Application->Assembly Information, they are added to AssemblyInfo.cs

So there has to be a way to access these at runtime.

Initially when I searched online to see what folks have to say about this, I came across a post where a MS employee!!! posted indirect ways to do that like writing a wrapper and using code generator to generate AssemblyInfo.cs from our custom class. Anyway, with simple concept of Assembly.GetExecutingAssembly() I could get what I wanted.

Then I noticed a method called GetCustomAttributes(true/false) which sounds interesting, especially when you look at segments of assemblyinfo.cs

// General Information about an assembly is controlled through the following 
// set of attributes. Change these attribute values to modify the information
// associated with an assembly.
[assembly: AssemblyTitle("XamlDemystified")]
[assembly: AssemblyDescription("Read This!")]
[assembly: AssemblyConfiguration("")]
[assembly: AssemblyCompany("")]
[assembly: AssemblyProduct("XamlDemystified")]
[assembly: AssemblyCopyright("Copyright © 2008")]
[assembly: AssemblyTrademark("")]
[assembly: AssemblyCulture("")]

These are attributes so GetCustomAttributes() should return these values.


So, I tried to print each "Type" of attribute returned (It returns list of objects) as I wanted to know if there is a way that I could get the values. The output I noticed, when I ran from my application was:
System.Windows.ThemeInfoAttribute
System.Diagnostics.DebuggableAttribute
System.Runtime.CompilerServices.CompilationRelaxationsAttribute
System.Runtime.InteropServices.ComVisibleAttribute
System.Reflection.AssemblyFileVersionAttribute
System.Runtime.CompilerServices.RuntimeCompatibilityAttribute
System.Reflection.AssemblyTitleAttribute
System.Reflection.AssemblyDescriptionAttribute
System.Reflection.AssemblyConfigurationAttribute
System.Reflection.AssemblyCompanyAttribute
System.Reflection.AssemblyProductAttribute
System.Reflection.AssemblyCopyrightAttribute
System.Reflection.AssemblyTrademarkAttribute

So, if you want to display Description of the Assembly, you could do something like this:
foreach (var attr inAssembly.GetExecutingAssembly().GetCustomAttributes(true))
{
               AssemblyDescriptionAttribute ada = attr asAssemblyDescriptionAttribute;
               if(ada != null) Display(ada.Description);
}


So, it is not difficult after all!!


I hope this helps quiet a few.

ScrollToEnd in a flow document

I would like to scroll the flow document completely to its end. Something like doing a Ctrl+End. A simple idea that stuck me was to use BringIntoView() method on a paragraph that is at the end of the flowdocument. To do that, look at the XAML.
<FlowDocumentScrollViewer Name="xD" KeyDown="xD_KeyDown">
        <
FlowDocument>
            <
Paragraph>LONG DOCUMENT IS HERE........................</Paragraph>
            <
Paragraph Name="xx"/>
        </
FlowDocument>
    </
FlowDocumentScrollViewer>

Then in the xd_KeyDown method, simply do the following.
private void xD_KeyDown(object sender, KeyEventArgs e)
{
           if(e.Key==Key.D)
               xx.BringIntoView();
}
So, every time "D" is pressed, the document navigates to the end! simple.

Dynamically create WPF UI that responds to events!

This is kind of complex, but simple in a totally different sense. As we all know one could create WPF elements on the fly using XamlReader.Load(). Shown below is snippet of code that does exactly this.

private string xmlns = "http://schemas.microsoft.com/winfx/2006/xaml/presentation";
private string xmlns_x = "http://schemas.microsoft.com/winfx/2006/xaml";

private object GetUIFromXaml()
{
XmlDocument xdoc = GetXamlDoc();

///
Now we are done with modifications, so we need an XmlReader. In this case, we use a XmlTextReader
///
We build a StringReader on the updated xml.
XmlTextReader xmlReader = new XmlTextReader(new StringReader(xdoc.OuterXml));

///
The above code is all the ground work needed to successfully load Xaml at runtime.
///
The XamlReader.Load() does the trick here. It compiles the Xaml into BAML and then builds the Object graph.
///
At the sametime, both the Visual Tree as well as the Logical Tree is constructed.
return XamlReader.Load(xmlReader);
}

private XmlDocument GetXamlDoc()
{
///
Xaml is XML. So we load the XAML as an XmlDocument.
///
The reason XmlDocument is used instead of XDocument is that we would like to add namespaces
///
so that the parsing is performed without issues.
XmlDocument xdoc = new XmlDocument();
xdoc.LoadXml(txtCode.Text);

///
We need to add the presentation framework namespace as well as the XAML namespace.
///This way a <Button>
like WPF objects would be properly identified.
if (string.IsNullOrEmpty(xdoc.DocumentElement.GetAttribute("xmlns"))) xdoc.DocumentElement.SetAttribute("xmlns", xmlns);
if (string.IsNullOrEmpty(xdoc.DocumentElement.GetAttribute("xmlns:x"))) xdoc.DocumentElement.SetAttribute("xmlns:x", xmlns_x);
return xdoc;
}

The GetXamlDoc method simply attaches namespaces to the XAML we wish to add. This way, even a XAML like

<TextBlock Name="txtErrors"  FontWeight="20" Text="Enter Code and Press TAB"/>

would work without issues. The XamlReader would then know where to look for TextBlock.

Now, the requirement is that we want to load buttons from XAML and attach event handler to button at "runtime". The general requirement is that we should be able to attach handlers to any WPF elements and this requires a lot of ground work which I am not showing here. So, I just simplified the problem to attach dynamic event handlers to only buttons.


//Create UI from XAML.
objectobj = GetUIFromXaml();
Buttonb = obj asButton;
if(b != null)
    AddHandlerToButton(b);

Now, the AddHandlerToButton method looks like shown.
private void AddHandlerToButton(Button b)
{
if (b.Name == "empty")
{
b.AddHandler(Button.ClickEvent, Delegate.CreateDelegate(Button.ClickEvent.HandlerType, typeof(Page1).GetMethod("b_Click",BindingFlags.Public|BindingFlags.Static), false));
}

}
So, the method shown above adds handler to the click event of the button by creating a delegate at runtime. Note that BindingFlags.Static is very important here. Otherwise, the reflection framework would try to instantiate Page1, which fails in InitializeComponent call. So make the b_Click as static such that no initialization takes place and you would successfully bind the method. Without the method being static, CreateDelegate would throw an ArgumentException saying "Error binding method to target".
The use of reflection allows one to make a completely dynamic WPF loader framework which can make use of user plugins, which defines static method handlers for WPF elements. He can then write a configuration based AddHandlerToElement method which loads the user plugin(dll) and attach the methods based on the configuration settings.
Note that you could also have done a d.Click += new RoutedEventHandler(b_Click); but this is not configurable.
Note that the XAML parsed would not allow "Click" or other events to be set within XAML. So you might want to add a separate piece of config which defines the names of the events, their handlers for a given element name. For example,
<Element name="empty" event="Click" method="b_Click" assemblyName="myassembly.dll,.,...."/>
Hopefully, this would help many who wants to make full use of dynamically created WPF forms.


Friday, October 03, 2008

Simple Data Binding Example in WPF

There are two list boxes in my form. One list box should retrieve values from "Roles" property while another list box should show the items that are selected from the roles list box. You can do something like this in WPF very easily, provided you understand data binding. Here is how we do it.

The listbox should first bind to "Roles" a property we define in the code-behind of the window. So the items property is bound as
<ListBox ItemsSource="{Binding Roles}" SelectionMode="Multiple" Name="roles"/>

But where does the framework look for "Roles"?
It first looks in the DataContext of the roles listbox. If it is not found, then it goes up to the parent and looks for its DataContext. In my example, the parent would be a StackPanel whose datacontext is set to "this" in constructor as shown.
public Window1()
{
           InitializeComponent();
           Roles = new List<string>() { "User", "Super User", "Lame User", "Yourself" };
           grid.DataContext = this;
}

Also observe, the Roles property has been created in the constructor. But the roles property has to be a DependencyProperty, if the data binding has to work properly.
public static readonly DependencyProperty RolesProperty =
        DependencyProperty.Register("Roles", typeof(List<string>), typeof(Window1));

        public List<string> Roles
        {
            get
           
{
                return (List<string>)GetValue(RolesProperty);
            }
            set
           
{
                SetValue(RolesProperty, value);
            }
        }

Now, let us look at the second listbox. The requirement is that the items inside the second listbox has to be pulled from the first list box. So its ItemsSource property has to bind with the "SelectedItems" property of roles listbox. Below, I show another way to binding without using Binding Expressions(" {} "). Instead we use Object Element "Binding" to perform the databinding.

<ListBox>
<
ListBox.ItemsSource>
<
Binding>
<
Binding.ElementName>roles</Binding.ElementName>
<
Binding.Path>SelectedItems</Binding.Path>
</
Binding>
</
ListBox.ItemsSource>
</
ListBox>


Note that SelectedItems is already a depedency property.


The complete XAML is shown.


<StackPanel Name="grid">
<
ListBox ItemsSource="{Binding Roles}" SelectionMode="Multiple" Name="roles">
</
ListBox>
<
Label>Selected Items</Label>
<
ListBox>
<
ListBox.ItemsSource>
<
Binding>
<
Binding.ElementName>roles</Binding.ElementName>
<
Binding.Path>SelectedItems</Binding.Path>
</
Binding>
</
ListBox.ItemsSource>
</
ListBox>
</
StackPanel>


Note that, we cannot set SelectedItems property of a listbox in XAML, as the compiler complains about the property being read-only.

As I learn more about DataBinding, I would post the stuff here.

Making HTTP Requests to secure sites

By the way, by secure I do not mean, for the HTTPS sites, but to those sites which have forms authentication. I recently had a situation where I needed to make a request to a web page. The page loads default user credentials from configuration (I know it is not secure, but its an intranet site, for internal use only). So the requests to be made was from a console application. So I thought, using HttpWebRequest would be good enough. But for subsequent requests, the user was not longer considered to be authenticated. But if I simulate the same using a Web Browser, then everything works fine. So I identified that ability to support cookies between requests was what missing, since I know my page does not differentiate requests using browser type. So, I wanted to make a request and support cookies at the same time. There are a lot of options to make a HTTP request in .NET, but I will for now only show the code that uses HttpWebRequest.

void MakeRequest(string url)
{
Console.WriteLine("Making Request to : " + url);
//WebClient wc = new WebClient();
//wc.UseDefaultCredentials = true;
//wc.CachePolicy = new RequestCachePolicy(RequestCacheLevel.Default);
//StreamReader sr = new StreamReader(wc.OpenRead(url));
HttpWebRequest hwr = WebRequest.Create(url) as HttpWebRequest;
hwr.Credentials = CredentialCache.DefaultCredentials;
hwr.CookieContainer = new CookieContainer();
StreamReader sr = new StreamReader(hwr.GetResponse().GetResponseStream());
while (!sr.EndOfStream) Console.WriteLine(sr.ReadLine());
Console.WriteLine("Request Complete");
}


The commented code uses WebClient but id does not work out as expected.


What we did essentially is to create a HttpWebRequest and set Credentials(to support Integrated Security) and CookieContainer. And it works!